I'm moving the blog, so all new posts can be found there. This blog will stay up with the older articles published for the foreseeable future.
Check out the new blog at:
Thursday, October 24, 2013
Saturday, October 19, 2013
Double trouble - fear in 40k

The online community that supports Warhammer 40k is large, vibrant, and absolutely petrified of change. The game as it stands now - or at any other fixed point in its history - can be easily quantified (e.g. Tau are stupidly OP!), and that's comforting to a community as large as this one. The problem is simple, really: people like sharing opinions (usually disguised as unassailable fact) because it allows them to connect with each other. How many events have you been to where someone has used a joke about Tau (or Grey Knights) as an icebreaker?
Sixth edition offers an incredible depth of gameplay, but many of its primary strengths are wholly new concepts and have been met with hostility. When 6e released double force organization was disregarded as ridiculous. I've played games that allowed it and analyzed hundreds more, though, and the truth is that it opens up the game to greater strategy and more narrative gameplay.
I understand the fear that comes with allowing a second force organization chart. People enjoy the game they're playing now, and using book rules at points levels of 2000+ is like playing a whole new game. Really, those fears are less about what other people might play - oh no, someone might play 6 Heldrakes or 360 Plague Zombies! - and more about the fact that your current army list isn't built for this new game.
 |
| Army composition from the GTGT 2013. |
The fear, though, is that everyone except for you will bring an army so min-maxed that you'll have no chance to win and won't have any fun. There are two primary factors that make this assumption incorrect: logistics and viability. The challenge of buying, building and painting all of the models for one of those lists is a big one: it'd certainly be expensive and time consuming but would definitely be possible. The real roadblock is your return on investment: even assuming every 2000pt tournament in your area allowed dual force organization, do you play in enough high points tournaments to justify the money and effort required to build and paint 360 Plague Zombies?
 |
| This book lets you play 4 Heldrakes in regular games. |
The reality is this: when you build a lopsided army that only does one thing really well, some games will go your way - but some armies will so severely overmatch you that you'll have no chance to beat them, and you'll never take down a major tournament.
Double force organization allows you to include a model or two that will improve your army and wouldn't fit into your normal build. You can have a third HQ leading a unit or add a Legion of the Damned unit to your Sternguard and Terminators. For the most part your 1850 army is going to be just fine as the core of your 2000pt army, and you're incredibly unlikely to run up against someone min-maxing the second force organization chart so hard that you can't have any fun against them. What you're more likely to see is a greater diversity of armies than at other tournaments, many of which will be fielded by players excited about being able to field more narrative choices without having to sacrifice the viability that comes with also including more points-efficient generic characters. In short you can have a lot of fun playing these games - if you let yourself.
Saturday, June 22, 2013
Who's a good doggy?
 |
| "Rar! Space Wolves! Smash the Eldar! Rar!" |
The problem is mobility; five of the six scenarios in the rulebook are objective-based, which makes mobile scoring units more important than ever before. Filling up Rhinos with Grey Hunters is essentially wasting the best tactical marines the game has to offer; those AV11 vehicles won't make it across the board alone, and large squads of foot-slogging power armor units have never been more vulnerable than they are now - they're just begging Heldrakes to single-handedly turn a game from a balanced tactical contest to a blowout.
With most armies I think it's important to shore up weaknesses by adding carefully-selected allies. In the case of the Wolves, though, I don't think that logic applies; they have access to great units that excel against pretty much every opponent, and their primary weakness is more closely related to the structure of the game itself than interactions with their opponents. Here's the list I put together for the Golden Throne GT:
HQ
Wolf Guard Battle Leader, Thunderwolf Mount, Power Fist, Storm Shield
Troops
10 Grey Hunters, 2 Plasma Guns, Power Axe, Wolf Standard, Drop Pod
10 Grey Hunters, 2 Plasma Guns, Power Axe, Wolf Standard, Drop Pod
5 Grey Hunters, Razorback with Twin-Linked Assault Cannon
5 Grey Hunters, Razorback with Twin-Linked Assault Cannon
Fast Attack
5 Thunderwolf Cavalry
5 Thunderwolf Cavalry
5 Thunderwolf Cavalry
Heavy Support
6 Long Fangs, 5 Missiles, Drop Pod
6 Long Fangs, 5 Missiles
This list is incredibly tightly focused one a very specific aspect of the game: putting fast, scary units in your opponent's face before they can muster a response. Your big first turn play is to deploy the Thunderwolves aggressively and drop both of the Grey Hunter pods in the center of your opponent's formation. The Hunters are an immediate threat that can't be ignored, and their plasmaguns and bolters can do some serious damage to tanks and infantry alike. The best part is that, if they're about to be charged, you can use your Wolf Standard to reroll all 1s during the Assault Phase - including any you roll during Overwatch. Factor in their Counter-Attack and they're capable of more than any tactical marine equivalent in the game.
 |
| This popped up on the first page of my Space Wolves image search. Serendipity! |
Running behind the pods are the Thunderwolves, and they're a significantly larger problem than the Grey Hunters. With six attacks each - plus Hammer of Wrath - on the charge, all of which are rending, these guys will obliterate just about anything in their path. The 6th edition rules for cavalry have made them infinitely better than previous editions, as they now move twelve inches during the Movement Phase, ignore difficult terrain and have fleet for charge distance rerolls. With their speed they can reliably hit close combat by turn two, and their general is a bona fide bad ass: the Wolf Guard Battle Leader hits like a Mack truck at Str 10, boasting a Thunderwolf mount of his own and a storm shield to protect him long enough to cross the board and eviscerate your opponents.
The two smaller Grey Hunter squads in their Razorbacks are going to be tertiary targets for your opponents. The pods and Thunderwolves will do a fantastic job of drawing fire in the early turns of the game, leaving the Long Fangs and Razorbacks to harass strategically important units without drawing much fire in return. Keeping centrally located objectives clear of opposing models is their primary function, and in the late game those Razorbacks will deposit the smaller Grey Hunter units onto those objectives to clinch the win.
 |
| How do you think this list would do at the Golden Throne GT? |
The final inclusion in the list - and one that makes me a little bit giddy - is the Long Fang's Drop Pod. It serves two purposes: first, to stack the two Grey Hunter pods onto the board turn one; and second, to slide under the radar as a cheap scoring unit during Big Guns Never Tire scenarios. Deploy the Long Fangs as usual in those scenarios, but when your pod comes in from reserves aim for an objective -- the special rule in Big Guns that makes Heavy Support scoring specifically notes that it applies to vehicles, making the pod itself a scoring unit that a fair number of opponents will completely ignore.
In calling for advice on building this army I heard a lot of suggestions for Drop Pods, but very few for Thunderwolves. What do you think of this list?
Thursday, June 20, 2013
How to win with Blood Angels
Blood Angels intrigue me. Once upon a time they were an assault-specialized army, and that's what their fluff supports. The real strength of the army in 5th edition, though, was access to cheap, fast transport vehicles with heavy firepower. Today vehicles are seeing less play than any time in the past five years and there are multiple power-armored armies whose close combat choices put assault marines to shame. Where do the sons of Sanguinus fit in?
Maybe the answer is the same thing that made 5th edition Blood Angels so effective: points efficiency and the ability to place intense, unrelenting pressure on your opponent.
 |
| It's time to get prepared for the Golden Throne GT! |
The Golden Throne GT 2013 is 2000pts and allows Warhammer 40k-approved Forgeworld units. Each scenario is straight from the rulebook, with very few tweaks to the basic rules of the game. Here's the list I've come up with for that tournament:
Blood Angels - Primary Detachment
Librarian, Shield of Sanguinus, Unleash Rage
5 Man Assault Squad with Melta Bombs, Razorback with Twin-Linked Lascannon
5 Man Assault Squad with Melta Bombs, Razorback with Twin-Linked Lascannon
5 Man Assault Squad with Melta Bombs, Razorback with Twin-Linked Lascannon
2 Platform Hyperios Air Defense Battery
2 Platform Hyperios Air Defense Battery
Space Marines - Allied Detachment
Chaplain in Terminator Armor
10 Man Terminator Assault Squad, Thunder Hammers & Storm Shields, Land Raider Redeemer
10 Man Tactical Marine Squad, Lascannon
Stormraven Gunship, Twin-Linked Multi-Melta, Twin-Linked Assault Cannon
Fortification
Aegis Defense Line, Quad Gun
 |
| My work-in-progress Imperial Fist assault terminators. |
The emphasis of this list is on points economy, something that power-armored armies aren't always very good at. The Aegis Defense Line, tactical marines and two pairs of Hyperios Platforms are the firebase we'll establish at deployment. The Three Razorbacks hold our forward-moving, objective-grabbing troop units while augmenting our long-range firepower.
Those Razorbacks will advance relatively slowly, since the five-man squads inside of them are relatively fragile -- it's important that their boots don't hit the board until late in the game. Front and center in that advance is the Land Raider Redeemer, boasting a marine-murdering flamer, a combat-squad half of a terminator assault unit and a chaplain in terminator armor. While long-range fire support is breaking apart tanks, the terminator squad will be decimating any unit that's dismounted from them.
The final hammer comes from the second combat-squad half of the terminator unit in the Stormraven. The 'raven can handle any tank or flyer, puts a big hurt on infantry squads and delivers a payload that hits like a brick. It's scary to put infantry inside of flyers, since they're not allowed armor saves when the flyer wrecks -- but these guys are equipped with storm shields and can handle even a worst-case scenario.
The concept here is to cherry-pick the most points-effective units from each codex (assault terminators are cheaper for Space Marines than Blood Angels), hit all of the list-building areas required in a successful list, and inject the flavor of the Blood Angels into the way the army plays. How do you think we did?
Wednesday, May 1, 2013
From the webway
 |
| "Onward, brothers, to glory!" |
Now that a new Eldar codex is on the horizon, I keep hearing this: "Maybe they'll finally be playable!"
Um, what?
Few armies received as much of a straight-up power gain with the release of 6th edition as the Eldar. The points-for-value gap between their vehicles and the cheaper, sleeker Dark Eldar vehicles was drastically reduced by the invention of Jink saves; the game's increased focus on foot units made some of their already-good choices stellar; and the ability to select from a large list of allies made them fantastic.
Let's take a look at a sample list I've built for 2000pt games. This list includes allies but not dual force organization, since that's an element of the game that tournaments are adjusting to slowly.
- Farseer: Runes of Warding, Fortune, Doom
- Fuegan
- Dark Eldar Archon: Shadowfield, Huskblade, Blast Pistol
- (3) 5 Fire Dragons: Wave Serpent, Shuriken Cannon, TL Scatter Lasers
- (3) 3 Guardian Jetbikes
- 14 Storm Guardians, 1 Warlock: Conceal
- (2) 5 Kabalite Warriors: Blaster, Venom: Splinter Cannon, Night Shields
- (2) Nightwing Interceptor
That's a 2000pt army that I could win a tournament with. It's not the best, most refined version that you could build; but it has all of the tools you need to succeed against a wide variety of opponents. The Farseer, Fuegan, and Archon combination are your ball of hurt -- they walk across the board with a 2+/2++ rerollable save and draw all of your opponents' shooting. Most players accompany these characters with Harlequins, but I've found that they're not really necessary; I prefer to stick the larger Storm Guardians troop unit with them, so that they have the ability to snag objectives once they've reached the other side of the board.
 |
| That's sarcasm - they're really NOT worth it! |
There's a distinct lack of melta in most lists these days, and I think as a result of that people are edging away from Fire Dragons. Eldar armies don't play like Imperial armies, though; you don't drop cheap meltaguns just because everyone else swears by plasma. Fifteen Fire Dragons should be destroying two or more tanks per turn, and they further increase the pressure on your opponent in the early game -- deal with those melta squads that can eat through tanks and Terminators alike before you've lost everything, or lay into the un-killable unit fronted by a character who fights like a monstrous creature and another with an AP2 instant death weapon? When you put decisions like these to an opponent you can take advantage of what is effectively (but not actually) poor target priority on their part.
Eldar jetbikes are obnoxiously fast. I played a game with a list very similar to this a week or so ago, and when my jetbike squads moved 48" on my first turn I had to stop to show my opponent their rulebook entry (he said, "If they could do that everybody would play them!"). The idea with these three bare bones units is to keep them in Reserve until you can't anymore, then to keep them out of line of sight until the last turn of the game. They've effectively taken over the role that Wave Serpents filled in 5th edition, rushing out from behind cover on turn 6 to claim an objective and snatch a win from the jaws of defeat. When you're playing against armies that are great at shooting but terrible in close combat you can also use them to ratchet the pressure up early -- nothing freaks a Tau or Guard player out more than a bunch of Eldar behind their gunline.
Kabalite Warriors are solid Troops, and in this basic formation they can occasionally pop a tank or down a couple of Terminators when you need to direct your Fire Dragons elsewhere. Venoms are the paragon of points efficiency, often denying range to anti-tank weapons with their Night Shields and pumping out 12 poisoned (4+) shots per turn at an effective range of 48".
 |
| It's also a beautiful model. |
The only Forgeworld units I've included here are two Nightwing Interceptors. I honestly believe that this might be the best Flyer in the game (yes, possibly even better than the Heldrake). It clocks in at 145pts for an AV10 Flyer with 2HP; it's standard weapons (at BS4) are two bright lances and two shuriken cannons, a total of 2 Str8 AP2 shots and 6 Str6 AP5 -- enough to do a huge amount of damage to an infantry squad or down another Flyer. The best part about it isn't the weaponry, though; it's that you almost can't hurt the stupid thing. The Nightwing has both the Shrouded and Agile rules, so it carries a 5+ cover save at all times that improves to an almost-unbelievable 2+ when it evades. It also has Vector Dancer, so it can turn both before and after making its move for the turn -- pretty much eliminating the need to ever leave the board.
The final unit I want to examine here is the one I think benefitted the most from the change to 6th edition: the Wave Serpent. I found these to be nearly unplayable in 5th edition, but today they're incredibly points-efficient. The way I like to equip them, with a shuriken cannon and a twin-linked shuriken cannon, comes in at 110pts (in the list above I used twin-linked scatter lasers, which give you additional reach and one more shot, but at 15pts above the shuriken cannons probably aren't worth paying for if you have somewhere else you need the points). The Venoms being used in this list are 75pts, and are some of the most efficient vehicles in the game. The Venom will average 4 wounds against a squad of Marines; the Wave Serpent will average 3. The obvious difference in their firepower is that the Venom can't so much as scratch the paint on a Rhino, while the Serpent's Str6 volley can potentially wreck one. Both vehicles have a 5+ save (the Venom's is better, since it works in close combat, but a Jink save is just as effective against shooting), while the Venom has a better reach (36" range vs. the Serpent's 24"). By playing the Serpent you're effectively choosing to pay roughly ten points per point of armor value you're gaining over the Venom and another ten to remove the open-topped bonus on the vehicle damage table. Their firepower is incredibly similar, and the Serpent is easily the more durable of the two. Overall, I think that they're relatively similar purchases in terms of points efficiency -- something that I never could've said without laughing last edition.
What kind of Eldar builds are you using? Frankly, I'm surprised that they haven't taken down a major tournament since 6th edition hit. Am I off my rocker?
Monday, April 8, 2013
Chicago Battle Bunker
 |
| This fantastic board was available only for painted armies. |
 |
| Yes, that is a Warhound titan and nine(!) Contemptor Dreadnoughts. |
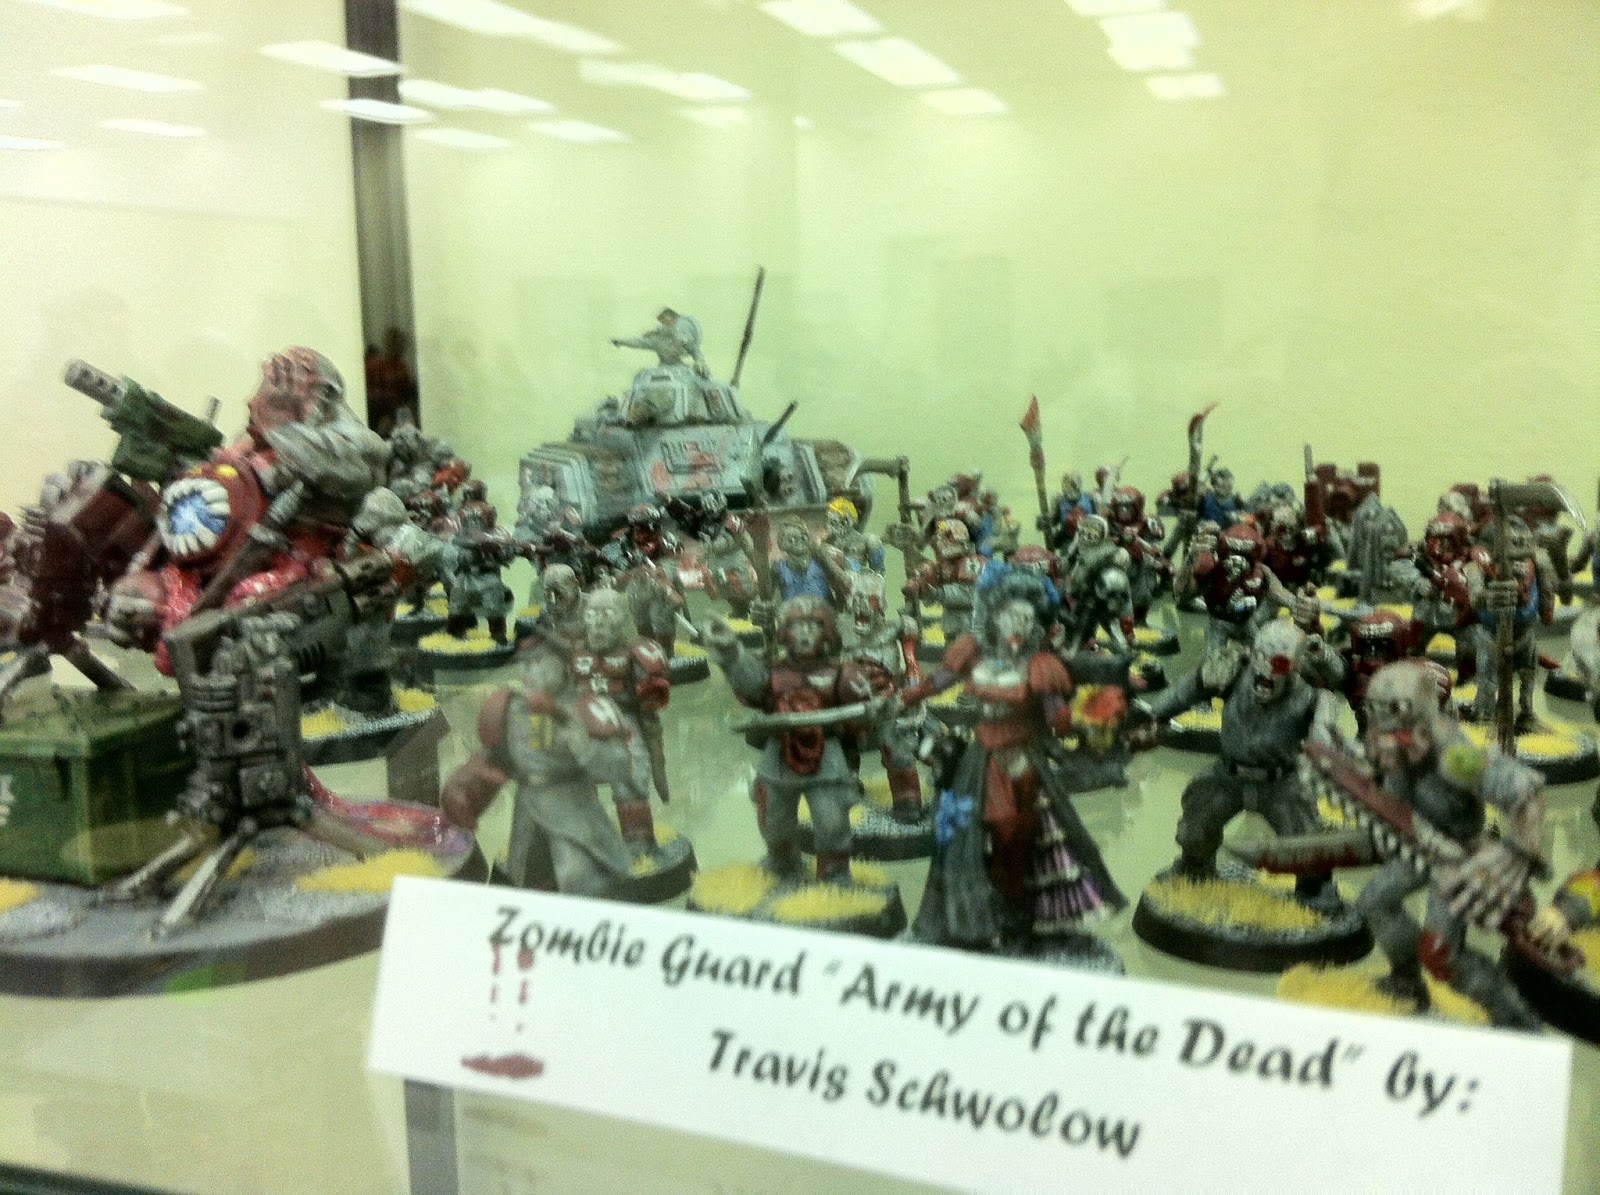 |
| This highly converted zombie Imperial Guard army was very impressive. |
 |
| Henry's army was beautifully painted, and his custom Aegis Defense Line got a lot of attention. |
My opponent was Henry, and he was super cool to play against. I'd bounced across the country with my army and had somehow managed to forget two of my Voidraven flight stands, my scatter dice, templates, and even my tape measure, and Henry was nice enough to let me borrow some of his extra gear through the length of the tournament.
I won the roll-off and deployed a couple of troops on objectives I'd placed at the 24" mark, forcing Henry's deployment into a six-inch window at his board edge (since the scenario required that you deploy 18" from enemy models). You can see his deployment in the photo above; he put his Tervigon inside the Aegis Defense Line, the Hive Tyrant sort of behind the Aegis and in area terrain, and a squad of Termagants beside the Tyrant in area terrain and largely blocked from my line of sight.
 |
| My poor army needs some TLC. I'm missing half my flight stands and most of my weapons have snapped off. |
Henry retaliated by bringing on his whole army - two more squads of Termagants, three Hive Guard, another Tervigon, a big squad of Gargoyles and a second flying Hive Tyrant - except for his two deep striking units. He explained to me that, according to the rules as written (RAW), Tyranids can operate freestanding guns but not the ones that are built into fortifications (like the heavy bolters on a bastion). I'm not sure if that's correct, but I was fine with it for this tournament. Henry's Gargoyles snap fired the quad gun at me (since it's a heavy weapon and they moved onto the board that turn) and managed to wreck a Venom. He advanced his two Flyrants, cast a couple of Psychic powers and that was about it.
 |
| This is going to hurt. |
Henry conceded and I took full points before turn five.
 |
| Defense lines make it easy to anticipate where your opponent will deploy. |
My opponent's name escapes me at the moment (sorry!) but he was another nice guy I was happy to play. He was fielding squishy Imperial Guard with lots of heavy weapons teams, a couple of Leman Russ tanks and a single Vendetta Gunship. I set up as close to him as I could get, with my Archon's Raider in the lead in case I could get an early charge off.
 |
| So many bodies! |
 |
| I tried to scatter to mitigate damage from the Leman Russ Battle Tank. |
On my first turn I moved up and put enough fire into each of my targets to force morale checks, since he'd deployed them in separate small units close to his board edge. He lost two squads over the edge of the world and four more were falling back at the end of the turn. Most importantly to me I managed to kill off two bases each from a missile launcher heavy weapon team and a lascannon heavy weapon team, and force both to fall back. My paper airplanes don't like being shot by either of those.
His first turn was rough, although he was able to rally both heavy weapons teams. His shooting was largely ineffective, and all he managed was to Stun my Archon Raider.
 |
| The Voidravens look much better when I don't forget the flight stands. |
On his turn two my opponent's Vendetta came on from reserve and tried to take down a Voidraven. The reason the Voidraven is such a great dogfighter was evident here, as I shook off a penetrating hit with my Flickerfield and didn't have to sacrifice shooting to evade. He did manage to take out my Archon's squad with the Demolisher and the Raider and Haemonculus with the Battle Tank as well, which meant that I'd have to board him to win full points.
On my third turn I shot down the Vendetta with a Voidraven and cleaned up nearly everything left on the board. My opponent told me that he didn't see Dark Eldar often at the bunker, and he was shell-shocked when I picked off seven Kill Points in that turn. He was left with nothing but a three-man squad of special weapons who ended their fall back move an inch from his board edge.
He rallied his last unit on his turn, so I walked some Wracks up to his quad gun and shot them down. I won with full points by boarding him.
 |
| This was one of four Chaos-ed statues on the learn-to-play board. |
His list included two squads of Daemonettes, two squads of Plaguebearers, a squad of Pink Horrors, a unit of 19 Flesh Hounds of Khorne, the Keeper of Secrets, the Lord of Change, and a Tzeentch Daemon Prince. In addition to Psychic powers, the new codex apparently forces you to spend a half hour rolling to generate different attributes and abilities specific to Daemons.
This game wasn't a lot of fun, mostly because the codex seems to be pretty complex and I hadn't read it yet. For example, my opponent rolled a power that he explained allowed him to reduce the invulnerable save of all of my vehicles to a 6+ for the duration of one phase. Turns out that it doesn't work like that at all; the ability can only target units which contain a Daemon and is used primarily to boost a friendly unit's invulnerable save by two points, and it lasts for one turn. I found that out the first turn when my opponent seized the initiative, and the Lord of Change cast Forewarning on the big unit of Flesh Hounds (who were suddenly an inch away with a 2++ save).
I spent my first couple of turns baiting his army into splitting -- big squads to my left where the objectives were, big models to the right and into the open -- so that I could mitigate the 38-wound 2++ unit of Flesh Hounds. I didn't take much damage, since my opponent gave up Furious Charge in favor of charging multiple Venoms and whiffing, but the sheer number of models he had on the board ate up our time in just three turns. By the time my reserves hit the board the game had swung into my favor, but with just three turns I wasn't able to pull out a victory. I wiped the Flesh Hounds with Voidravens, reduced the Marked for Death unit to a single model and killed the Daemon Prince, but I'd lost more units than that when time was called.
Overall I had a great time and was happy that I'd had the chance to play. I usually try to learn the broad strokes of every codex before playing in tournaments, and the last round against Chaos Daemons really reminded me of why I do that: I don't mind taking the loss, but it would've been much more fun to finish the game -- even if the outcome had been the same.
Sunday, March 31, 2013
Covering the battlefield
There are a lot of logistics involved in organizing a grand tournament. One major aspect of those responsibilities revolves around terrain -- it's important to have enough, to have pieces of quality people will be happy to pay to play on, and to appropriately control and categorize individual pieces so that they can be properly stored and transported. I thought it might be interested to give you a glimpse at what's being done for the Golden Throne Grand Tournament 2013 in that arena.
The unique tournament format for the Golden Throne allows for 128 players. That's 64 tables, or over 1500 square feet of battlefields under one roof. It's also a big crowd of players you don't want to disappoint with terrain that's lacking (or with a lack of terrain). The old rule of thumb was 25% coverage, but that doesn't really jive with sixth edition missions -- instead the goal here is for a minimum of 30% coverage, or over 450 square feet of terrain (that's the estimated need, at least; the actual goal is 500). The breakdown continues past that, displaying the estimated number of pieces of each type of terrain necessary to provide that coverage. It's not just raw coverage that matters, though.
The quality and diversity of terrain is as important as the amount of it. No one wants to play on a table covered in Coke cans or old textbooks covered in felt -- what everyone wants is to be so deeply immersed in a game that, just for a moment, they can forget it's just a game and be drawn into it as if they were watching a great film. The tournament format for the Golden Throne is built around that, emphasizing enjoyable, cinematic games rather than time-crunching turns and a race against the clock.
Great terrain can tell a story. I'm excited for the Golden Throne this year because that's the goal -- beautiful terrain, a relaxed tournament format, and great stories.
 |
| Here's a snapshot showing terrain requirements for a 128-player tournament. |
The unique tournament format for the Golden Throne allows for 128 players. That's 64 tables, or over 1500 square feet of battlefields under one roof. It's also a big crowd of players you don't want to disappoint with terrain that's lacking (or with a lack of terrain). The old rule of thumb was 25% coverage, but that doesn't really jive with sixth edition missions -- instead the goal here is for a minimum of 30% coverage, or over 450 square feet of terrain (that's the estimated need, at least; the actual goal is 500). The breakdown continues past that, displaying the estimated number of pieces of each type of terrain necessary to provide that coverage. It's not just raw coverage that matters, though.
.JPG) |
| A great corner ruin, one of the cornerstones of tournament terrain. |
The quality and diversity of terrain is as important as the amount of it. No one wants to play on a table covered in Coke cans or old textbooks covered in felt -- what everyone wants is to be so deeply immersed in a game that, just for a moment, they can forget it's just a game and be drawn into it as if they were watching a great film. The tournament format for the Golden Throne is built around that, emphasizing enjoyable, cinematic games rather than time-crunching turns and a race against the clock.
.JPG) |
| When I first saw this I thought, "What happened here?" |
Saturday, February 16, 2013
Crash and burn
 |
| This is what the final straw looks like. |
Fwoosh!
Some of the new flyer rules must be for flamers, because that's the sound of the new Death from the Skies supplement (which is available as of today exclusively through the Games Workshop website) burning bridges at several independent retail stores.
Here's an open letter from Pat Fuge, CEO of the Gnome Games retail chain in Wisconsin:
"Dear Games Workshop. You have made it less than desirable to sell your games and allow our place space to be used for your exclusive sales to the customers we take care of. For that reason all content in your new Aerial Combat Book is banned for all of our events. The book will not be allowed in our stores and is considered contraband.
GW players if you want to trade in your armies for store credit for Warmachine we have an opportunity for you. Please email ihategw@gnomegames.com for details."
Gary Ray of Black Diamond Games posted a similar sentiment on his blog:
"Trade in your current edition Warhammer 40K or Warhammer Fantasy rulebook and you take 40% off a starter box or rulebook for Warmachine or Hordes. We've done this with role-playing before, notably D&D and Pathfinder, so we know there are likely a bunch of rulebooks gathering dust and the need for excuses to start a new game. Let this be your excuse."
Additionally, as of this posting several other independent retailers have pledged to ban the use of Death from the Skies in their stores. The supplement represents a tipping point in the strained relationship between independent retailers and Games Workshop, which released several exclusive products through their official website recently, cutting out independent retailers and driving consumers directly to Games Workshop for their hobby fix.
Friday, February 15, 2013
More than just a Heldrake
 |
| No, really, it's good! |
Wrong.
The Chaos Space Marine codex is one the most well-written sets of rules in Warhammer 40,000. More than that, I think the codex is dynamic, challenging and fun -- aside from Grey Knights, Chaos Space Marines are the only marine army that doesn't restrict your troops choices solely to marines. The designers made a clear effort both to reinvigorate outdated codex choices and to introduce new and flavorful alternatives that work both thematically and competitively.
Close combat Dreadnoughts are few and far between in the competitive game. They're slow, and it's not unreasonable for a lucky lascannon shot to blow them up. Rather than do something silly like create virtually indestructible long-range, high-strength shooting attacks for them (like the aforementioned Grey Knights), the Chaos Space Marine codex offers you two new options for close combat Dreads: Helbrutes and Maulerfiends. Both are inexpensive and both are better than a standard Space Marine Dreadnought, but it's the Maulerfiend that really stands out: he moves 12 inches without being slowed by terrain, is immune to dangerous terrain checks (thanks to Move Through Cover), has a 5+ invulnerable save, ignores Shaken and Stunned effects on a 2+, can reroll as many charge dice as he chooses, and is one of the most efficient close combat anti-vehicle models in the game. All of that for 125pts is a steal.
At this point the Heldrake is fairly self-explanatory: the combination of strength 7, AP3 vector strikes (which ignore cover) and a strength 6, AP3 Baleflamer (which also ignores cover, has a 360 degree arc of fire and can be thrown 12 inches from the Heldrake itself) makes this bad boy a top contender for best Fast Attack choice in the game. The Heldrake never has to Evade because it has a 5+ invulnerable save, and it's rarely affected by Shaken or Stunned results due to its 2+ roll to ignore them. This thing lives to eat marines, particularly those of the Ravenwing variety.
 |
| The finished product. |
- Typhus
- 2 Helbrutes, double power fists
- 35 Plague Zombies
- 35 Plague Zombies
- 30 Plague Zombies
- 3 Maulerfiends
- 3 Heldrakes, Baleflamers
- Aegis Defense Line, Quad Gun
- Total Points: 1845
The concept behind this list is to park a big group of Plague Zombies behind the Aegis Defense Line and let Typhus man the Quad Gun. The Maulerfiends are usually able to get a second turn charge (at worst -- it's not uncommon to make the charge on turn one), and the Helbrutes follow a turn or two behind. The combination of AV12 saturation, the Maulerfiends' speed and the survivability their invulnerable save offers them tends to overwhelm any opponent whose army isn't built around thunder hammers and storm shields. Two or three Heldrakes usually join the party by turn two, effectively pinning the opponent down in his deployment zone -- his choices are to fight what's in front of him to avoid being boarded, or to shoot at literally 100 troop models that have a 4+ save with Feel No Pain and are Fearless to the last man. I'll start moving those Zombies up to the midfield around turn three, and by turn five there won't be enough of my opponent's army left to contest.
It's a fun, fast-moving and hard-hitting army, and it's the off-the-top-of-my-head build. What do you think -- am I wrong? Is the Chaos Space Marine codex boring or bad?
Tuesday, February 12, 2013
The Spartan Steamroller
 |
| I snagged this Spartan photo from White Dwarf Daily. |
- Hyperios Platforms cost the same as most devastators, and are better in almost every way. In a standard marine army 140pts will buy you 4 platforms with a better chance to hit ground targets and flying targets than typical marines, with the additional benefit of toughness 6 and two wounds.
- Predator Executioners seem to be pretty fantastic. They're essentially a three-shot plasma cannon that doesn't get hot. I'm not certain that they deserve sponsons, since they're not fast even in a Blood Angels army, but a couple of these should be able to hammer infantry units or bundled tanks pretty savagely.
- The Spartan Assault Tank is incredibly good. For 55pts more than a standard Land Raider you get two more twin-linked lascannons, an extra hull point and a 25 model capacity.
I've always wanted to paint a Blood Angels army, and I figured this was a good chance to build something fun and competitive. Here's the list I came up with:
 |
| This isn't my model, but I wish it was. |
- Librarian with Shield of Sanguinus, Unleash Rage
- 24 Death Company, 5 power mauls
- 5 Assault Marines, Razorback with twin-linked assault cannon
- 5 Assault Marines, Razorback with twin-linked assault cannon
- 5 Assault Marines, Razorback with twin-linked assault cannon
- 5 Assault Marines, Razorback with twin-linked assault cannon
- 5 Assault Marines, Razorback with twin-linked assault cannon
- Spartan Assault Tank, no-melta-for-you-upgrade
The total cost on this list is only 1745pts. I had a chance to test it out tonight against James, a Chaos Daemon player with the following list:
 |
| This actually is James' Nurgle Daemon Prince, as featured on BoLS. |
- Epidemius
- Great Unclean One
- 7 Plaguebearers
- 7 Plaguebearers
- 9 Flamers of Tzeentch
- 9 Flamers of Tzeentch
- CSM Daemon Prince of Nurgle, Power Armor, Wings, Black Mace, Psyker Mastery 3, Spell Familiar
- 15 Cultists, Mark of Nurgle
- Aegis Defense Line, Quad Gun
We played a Bay Area Open scenario with Purge the Alien as the primary mission (4pts) and the Scouring as the secondary (3pts) in Vanguard Strike deployment. I deployed in a brick right up against the line with the Librarian and Death Company in the Spartan, two Assault Marine squads in Razorbacks and three more Assault Marine squads in reserve. James stuck his Daemon Prince in a ruin for a 2+ cover save (since Daemon of Nurgle gives him Shrouded) and put his Cultists on the defense line.
I went first and didn't accomplish much aside from putting a couple of wounds on the Daemon prince and one on the autocannon. James got his preferred wave and ran right into my anti-Daemon spread of Razorbacks, scattering a squad of Flamers and Epidemius into mishaps. He repositioned his prince as a counter-charge unit against my impending Death Company assault and it was my turn again.
Turn two I managed to immobilize my Spartan, but only after moving five of the six inches I was planning to. I disembarked my twenty-five Angels, repositioned my Razorbacks, and proceeded to wipe James' poor Daemon Prince with the Spartan's quad lascannons. The Death Company handled the Cultists with ease and officially cleared the opposing backfield for me, and at that point the game was pretty much finished. James' Flamers couldn't get a great bead on my Death Company because I shielded them with Razorbacks, and even if he could've their Feel No Pain and the huge number of models I had on the board would've made for an uphill battle. We called the game after he lost a squad of Flamers to a round of shooting and the other rolled a mishap and I placed them in the far corner of nowhere.
Overall I'm incredibly happy with the Spartan. For 55pts more than I would've paid for a Land Raider I was able to transport a 25-man bomb unit across the board and throw four twin-linked lascannons at the Daemon Prince each turn. The increased number of lascannon shots was a big deal, since moving the Land Raider 12 inches on turn one meant that I had to snap fire -- the two extra shots meant four more chances to roll a hit, and put a wound on that nasty Nurgle prince. Sixth edition games tend to reward armies that can control the midfield and pressure the opponent's deployment zone, and the Spartan really delivers in that regard -- it's nearly impossible to destroy and delivers an absolutely beast close combat unit.
Subscribe to:
Posts (Atom)